Handling tanks and resource directories
Untanking a resource fileThe resource files for Dungeon Siege are commonly called tanks. And they are compressed folders and files just like a zipfile.To untank a DS resource file you need to use TankViewer or TankExtractor. Understanding Your Directory StructureThe first step in creating your mod is understanding where to save the e.g. new item for compilation later. If it is not saved in the exactly correct location, the game will not use your new item for any references. As a general rule setting up this should be your first step. For all items created, they should go in the folder structure of <base>/world/contentdb/templates/regular/interactive. Where <base> is a general directory you create to house your entire project to compile. It is very important you have a base directory or your project will not compile the correct structure. (Figure 1.1) While there are different areas for elite and veteran skill (covered later), all items must go into the above directory in order to appear in any skill. It may say regular, but the other skills inherit the items found in that directory. It should be noted that the stucture is a bit different for the different games. The structure in figure 1 is for DS1.  figure 1 No matter what type of mod you create you have to know where in the structure your files should be saved. If you are unsure, it is a good idea to look at the original tanks to see where similar items are stored. Creating a tankAfter you have created an item you need to create a tankfile. To do this you need to use either Siege Editor or Tank Creator. There are some versions available on the net but this one can be used for both DS1 and DS2.1. Load up the GUI for the creator, TankCreator2.exe if you downloaded the application linked above. 2. The first thing we need is the source that will be compressed. Type in or browse to the base directory for your mod. In this case D:\nivisec_item_core. 3. After that you need to select your output. Type in or browse to the directory where you want it to appear. D:\New tanks\ in our case. You also need to type in the name of your new tank on that same line. We use Nivisec_Test.dsres here. If your tank is for DS2 or broken World you need the use ds2res instead of dsres when you name your tank. 4. You also need to select what game you are compressing a tank for. That is done with the two radiobuttons below to the left where it says "Format:". 5. Now you simply hit Create and you are done. Note the button that says "Simple". If you hit that there are some options that you can play around with. 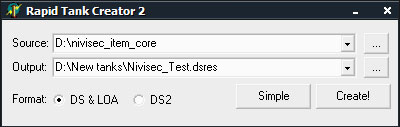 figure 2 (the original text for this tutorial was written by Nivisec, and is published with permission) |
||