DS1
Zonematch workarounds |
||
Since Zonematch is no longer available some workarounds have been developed. More information about them can be found here: Dungeon Siege Game Zone (zonematch workaround) |
||
Understanding the NNK |
||
Well, the first thing you have to understand is that the game uses the NNK to know where to find meshes, animations, and textures. The NNK is basically a list of directories and directory trees that the game executable uses to look up a filename, and figure out where that file is stored. For example, Farmgirl's face skins are found in the folder art\bitmaps\characters\good_a_heroes\farmgirl\ |
||
Assigning a Pre-Set Minimum Gold Value To Your Item |
||
Assigning a Pre-Set Minimum Gold Value To Your ItemWe will use the Simple Sword template, from the Creating A Simple Item - Sword tutorial, and modify it here. All items are assigned gold values the same way: 1. Under the [aspect] block we will assign a new field that is simply gold_value = AMOUNT;. Replace AMOUNT with the miniumum amount of gold you want your item to be worth when generated. [t:template,n:nivisec_simple_sword]
{
doc = "Dragon Lords Sword";
specializes = base_sword;
[aspect]
{
model = m_w_swd_055;
gold_value = 1000;
}
[attack]
{
f damage_max = 407;
f damage_min = 307;
}
[common]
{
pcontent_special_type = rare, unique, normal;
screen_name = "Steel of the Dragon Lords";
}
[gui]
{
active_icon = b_gui_ig_i_ic_swd_005;
equip_requirements = strength:30, dexterity:45;
inventory_height = 4;
inventory_width = 1;
inventory_icon = b_gui_ig_i_w_swd_088;
}
[pcontent]
{
[base]
{
f modifier_max = 14.000000;
f modifier_min = 7.000000;
}
}
}The Completed Sword Template template 1 |
||
Making Your Item Un-sellable to Smiths/Vendors |
||
Making Your Item Un-sellable to Smiths/VendorsWe will use the Simple Sword template, from the Creating A Simple Item - Sword tutorial, and modify it here. All items are assigned this value the same way: 1. Under the [gui] block we will assign a new field that is can_sell = false;. Set this to true or false depending on if you want your item to be able to be sold to NPCs. [t:template,n:nivisec_simple_sword]
{
doc = "Dragon Lords Sword";
specializes = base_sword;
[aspect]
{
model = m_w_swd_055;
gold_value = 1000;
}
[attack]
{
f damage_max = 407;
f damage_min = 307;
}
[common]
{
pcontent_special_type = rare, unique, normal;
screen_name = "Steel of the Dragon Lords";
}
[gui]
{
can_sell = false;
active_icon = b_gui_ig_i_ic_swd_005;
equip_requirements = strength:30, dexterity:45;
inventory_height = 4;
inventory_width = 1;
inventory_icon = b_gui_ig_i_w_swd_088;
}
[pcontent]
{
[base]
{
f modifier_max = 14.000000;
f modifier_min = 7.000000;
}
}
}The Completed Sword Template template 1 |
||
Having Your Item Not Be Part Of The PCONTENT Pool |
||
Having Your Item Not Be Part Of The PCONTENT PoolWe will use the Simple Sword template, from the Creating A Simple Item - Sword tutorial, and modify it here. All items are assigned this value the same way: 1. Under the [common] block we will assign a new field that is is_pcontent_allowed = false;. Set this to true or false depending on if you want your item to be able to be considered for the pcontent pool. That means wether or not the monsters will drop it and the smiths will sell it randomly. If you set this to false, your item will never drop in the game unless you assign it to drop by force (addressed in a later tutorial). |
||
Adding Your Items To The PCONTENT Pool (Random Drops/Sellings at Vendors) |
||
Adding Your Items To The PCONTENT Pool (Random Drops/Sellings at Vendors)We will use the Simple Sword template, from the Creating A Simple Item - Sword tutorial, and modify it here. All items are added to pcontent the same way: 1. First we need to specify an optional type of pcontent drop under the [common] block. If you do not include this line, it defaults to dropping only "normal". It is in the form of pcontent_special_type = TYPE(S);. You can replace types with rare, unique, and/or normal. Each one seperated by a comma if you include more than one type. |
||
Making Your Items For Sale In Regular Skill - Elddim Blacksmith |
||
Making Your Items For Sale In Regular Skill - Elddim BlacksmithAfter you have created your item(s) you will want to have a easy way of testing them. For this step, you will need npc_blacksmith.gas to edit. Note that it is edited by me(Nivisec) to remove all other items sold by the smith besides the ones we add. If this is not done, you risk the chance of your templates not always showing up in the list. Please download it and have it handy: 1. First, we need to make a new directory under the base directory with the items you want to have available at the blacksmith. It is in the form of /world/contentdb/templates/regular/actors/good/npc. Make sure to use the same base directory as you did for the items. See figure 1 as an example. 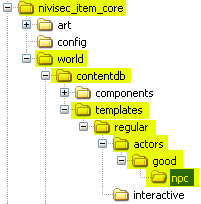 NPC directory. figure 1 2. Open up your npc_blacksmith.gas and look/search for the template part named [t:template,n:blacksmith_zabar_treseck] (figure 2). 3. Now we shall insert all the item templates we have created in game. Take notice of the structure mainly at this point and how the items are sold in it. Notice [inventory], [store_pcontent], [TAB_NAME]. There currently is no tab named [our_items], so we must insert it (Figure 4.2). Don't forget to enclose it with the { and } characters. The tab name is not important, the game sorts the items into the appropriate place automatically. 4. We are interested only in having the smith sell our new items, so we create a new header of [all*], which basically tells the smith to sell everything underneath this tag (figure 2). You must create a new [all*] tag for each template item. 5. Now we will insert our created items in the form of il_main = #TEMPLATE_NAME; under our [all*] tag. We will replace TEMPLATE_NAME of course with the names of the templates we created. In my case, I named them nivisec_simple_sword and nivisec_simple_chain_mail. For general testing, you may also give each item an optional power range to apply modifiers on the item when sold. It is places in the form of il_main = #TEMPLATE_NAME/POW_MIN-POW_MAX;. Again reaplce TEMPLATE_NAME and POW_MIN with the minumum power area and POW_MAX with the maximum power area. In general, if you want to randomly choose any and all modifiers in the game use 1-2500 (figure 2). 6. Last you will need to specify a min and max amount of items to show in the shop. It is important you put at least a min = 10; max = 10; here, because some item templates will not appear without a decent number specified. It is a bug in the game, especially with weapon templates when set to use a magic prefix/suffix like below. 7. If you wish for your item to for sure appear 100% of the time, you can look for the [store] tag and then insert a new block called [item_restock]. 8. Note that you can not specifiy any magic parameters, it just uses the base template with no additions. You use the form of TEMPLATE_NAME = STOCK_NUM;. Here you will replace TEMPLATE_NAME with the name of your template(s) and STOCK_NUM is the number of this template you want 100% for sure stocked in the smith's item set. [t:template,n:blacksmith_zabar_treseck]
{
category_name = "1W_shopkeep";
doc = "blacksmith, elddim (MP)";
specializes = base_npc_bs;
[actor] {portrait_icon = b_gui_ig_i_ic_c_foulton;}
[aspect]
{
model = m_c_gbn_bk_pos_1;
[textures] { 0=b_c_gbn_bs-02; }
}
common:screen_name = "Blacksmith Zabar Treseck";
[inventory]
{
[store_pcontent]
{
full_ratio = 1;
[our_items]
{
[all*]
{
il_main = #nivisec_simple_chain_mail;
max = 10;
min = 10;
}
[all*]
{
il_main = #nivisec_simple_sword/1-2500;
max = 10;
min = 10;
}
}
[armor]
{
[all*]
{
il_main = #body/1-8;
max = 10;
min = 10;
}
[all*]
{
il_main = #body/20-41;
max = 4;
min = 4;
}
[all*]
{
il_main = #boots/1-12;
max = 8;
min = 8;
}
[all*]
{
il_main = #gloves/1-12;
max = 8;
min = 8;
}
[all*]
{
il_main = #helm/1-12;
max = 8;
min = 8;
}
[all*]
{
il_main = #boots/25-35;
max = 4;
min = 4;
}
[all*]
{
il_main = #gloves/25-35;
max = 4;
min = 4;
}
[all*]
{
il_main = #helm/25-35;
max = 4;
min = 4;
}
}
[shields]
{
[all*]
{
il_main = #shield/1-10;
max = 8;
min = 8;
}
[all*]
{
il_main = #shield/10-16;
max = 4;
min = 4;
}
[all*]
{
il_main = #shield/25-35;
max = 4;
min = 4;
}
}
[weapons]
{
[all*]
{
il_main = #melee/1-6;
max = 15;
min = 15;
}
[all*]
{
il_main = #melee/15-20;
max = 4;
min = 4;
}
[all*]
{
il_main = #ranged/1-6;
max = 15;
min = 15;
}
[all*]
{
il_main = #ranged/15-20;
max = 4;
min = 4;
}
}
}
}
[store]
{
item_markup = 2;
[item_restock]
{
nivisec_simple_chain_mail = 3;
nivisec_simple_sword = 3;
}
}
}
//CUT OFF FOR VIEWING PURPOSES, DO NOT DELETE THE OTHER INFORMATIONtemplate 1 Blacksmith Template 9. Now there is only one thing left to do. Save this file in the directory structure you have made under your base directory. It is very important that you save in the npc directory and use the exact file name as you downloaded it as (npc_blacksmith.gas) or it will not work. Also, it will not work if you remove anything from the file! Do not delete any lines (figure 3). 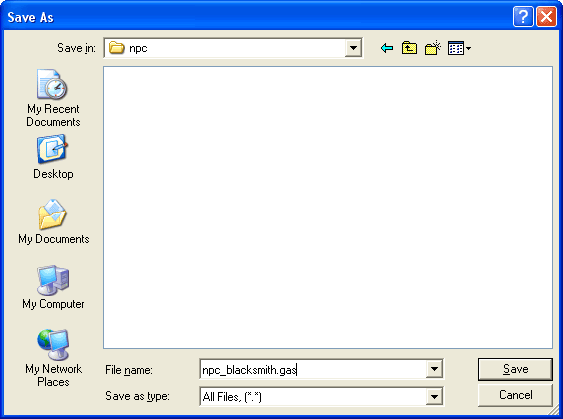 Saving the gas file in npc directory figure 3 tutorials: |
||